Image Input Guidelines
This document summarizes the recommended conditions for input images that allow Liveness Detection (anti-spoofing) to achieve the highest possible accuracy. Images that do not meet these conditions may result in reduced detection accuracy, or the face may not be detected and a 400 invalid_image response may be returned.
Supported Formats
| Item | Requirement |
|---|---|
| File format | JPEG / PNG |
| Maximum size | About 7 MB of raw image data (10 MB for the whole Base64-encoded request) |
| Image type | A color image captured with a visible-light camera. Infrared (IR) sensor images are not supported. |
.jpgfiles are also supported..jpgand.jpegare the same JPEG format, so specify"jpeg"forimage_formatregardless of the extension (the values accepted forimage_formatare"jpeg"and"png").
⚠️ Do not send a cropped face image
If you send an image cropped down to the face rectangle, liveness detection cannot work correctly. Send the whole frame as captured, including the area around the face.
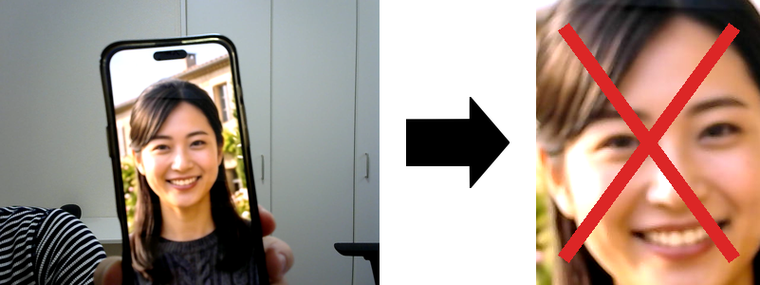
Liveness detection relies not only on the face itself, but on the traces of the photo or device that remain around it:
- The bezel (frame) of a smartphone or tablet
- Reflections, moiré patterns, and uneven brightness on a display
- The edge of printed material, the paper texture, and the hand holding it
- Unnatural depth relative to the background
Cropping to the face alone removes all of these cues.
Furthermore, an image cropped to the face rectangle occupies too large a share of the frame to be assessed at all. When the face-area ratio exceeds a fixed upper limit (about 65% of the whole image), this API does not run the spoof/genuine decision and returns a 400 invalid_image error (for example, the message Face position error(1005) - Too close). Getting closer to the camera or cropping to the face therefore does not let you slip past detection (see “④ The face fills the frame”).
Take particular care if you run face detection in a separate system. If you crop using the results of an upstream face detector before calling this API, the evidence needed for detection is lost. Face detection is performed by this API, so send the whole frame without cropping (the coordinates of the detected face are returned in
faceRectArea).
Image and Face Size
| Item | Recommendation |
|---|---|
| Frame size | VGA (640×480) or larger |
| Face width | At least 80 px |
Capture the image so that the width of the detected face region is at least 80 px. If the face appears too small, it may not be detected. Increasing the frame size allows you to keep the face region large enough even when capturing from a greater distance.
Brightness
- We recommend an average luminance value of 50.0 or higher for the face region (8-bit, 256 levels).
- Avoid backlighting and dark environments, and capture the image where the entire face is evenly lit.
Face Orientation (Detectable Angle of View)
- We recommend keeping the face within approximately ±30° both vertically and horizontally relative to the frontal position.
- There is individual variation depending on factors such as face shape.
- A profile view, a heavily tilted face, or an extreme downward or upward gaze may not be detected.
Capture Distance
- We recommend a distance of approximately 30 cm to 1 m from the camera to the face.
- Increasing the resolution of the input image allows capture from a greater distance as well (be sure to maintain a face width of at least 80 px).
Recommended Specifications When Capturing Directly with a Camera (Reference)
For a configuration in which the End User captures an image with a camera before liveness detection, we recommend the following on the camera side.
| Item | Recommendation |
|---|---|
| Camera resolution | VGA (640×480) or larger (720p / 1080p, etc. are also acceptable) |
| Capture distance | Approximately 30 cm to 1 m |
| Field of view | Approximately 50° to 110° |
| Lens | Fixed-focus lens recommended |
Trade-off between resolution and processing speed: A higher resolution lets you keep the face large enough from a greater distance, which helps accuracy. However, the higher the resolution, the larger the image per request, and the longer transmission and processing take. Choose a resolution suited to your use case while keeping the face width at 80 px or more. An excessively high resolution can increase processing time without improving accuracy.
Input and Output Samples
Examples of images the API can assess.
About the output images: This API returns JSON only — it does not return an image. The right-hand side of each figure below is an example of
faceRectArea(the coordinates of the face rectangle) andisFakeFacedrawn onto the input image on the Customer’s side.
Real face (isFakeFace: false)
A genuine person is in front of the camera.
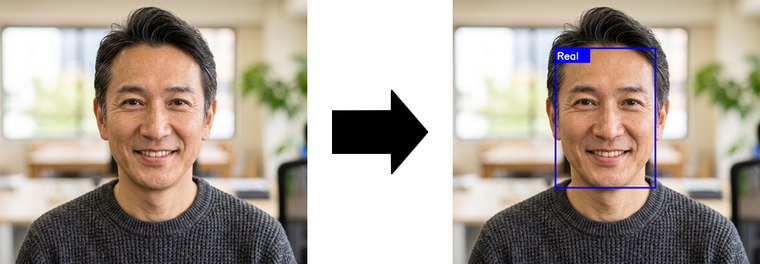
Note: This image was generated by a generative AI (Google Gemini).
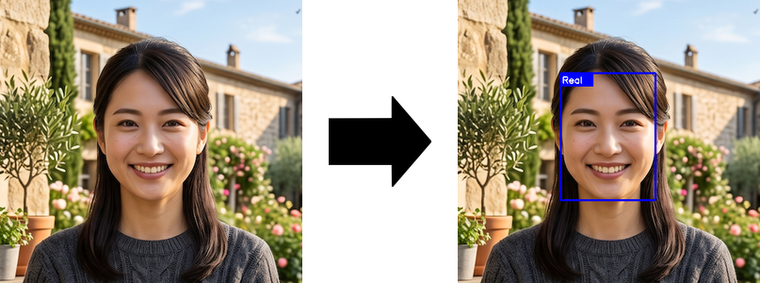
Note: This image was generated by a generative AI (Google Gemini).
Fake face (isFakeFace: true)
A typical presentation attack: a face photo shown on a smartphone and captured with a camera. Note that the whole frame — including the bezel, the hand, and the background — is submitted.
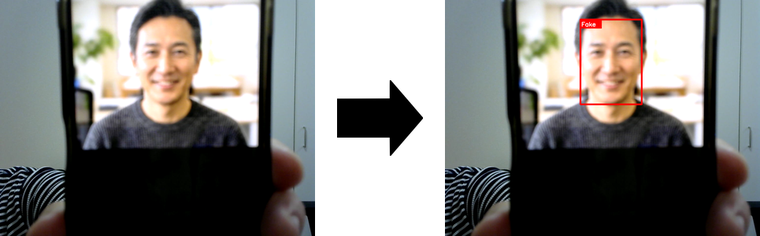
Note: The face photo shown on the smartphone was generated by a generative AI (Google Gemini).
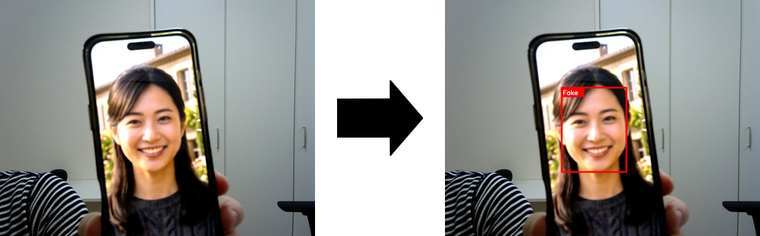
Note: The face photo shown on the smartphone was generated by a generative AI (Google Gemini).
About Accuracy
Detection results fall into four categories, depending on the combination of the actual face (real or fake) and the verdict (isFakeFace).
| Category | Definition | Assessment |
|---|---|---|
| True positive | A fake face is judged isFakeFace: true |
✅ Correct |
| True negative | A real face is judged isFakeFace: false |
✅ Correct |
| False positive | A real face is judged isFakeFace: true (a genuine user is rejected) |
❌ Incorrect |
| False negative | A fake face is judged isFakeFace: false (a spoof gets through) |
❌ Incorrect |
Because of how the model is trained, certain image types may produce false positives or false negatives.
| Type of error | Cases where it is more likely |
|---|---|
| False positive (rejects a genuine user) | ② The whole image or the area around the face is dark / ③ Something bezel-like appears in the background |
| False negative (lets a spoof through) | ② The whole image or the area around the face is dark |
In addition, the following two cases are intentionally not assessed, and a 400 invalid_image error (whose message contains Face position error) is returned (these are deliberate guards, not misjudgments):
- ① The face is at the edge of the frame — assessment is stopped because a face cut off at the edge becomes distorted.
- ④ The face fills the frame — assessment is stopped because when the face area is too large, the cues for spoof detection are lost.
For how to avoid each of cases ①–④, see “Case Studies of Common Accuracy Errors” below.
Note that isFakeFace is a reference verdict that becomes true when isFakeLikelihood (0.0–1.0) exceeds the default threshold of 0.15. Depending on your use case, you can also evaluate isFakeLikelihood against your own threshold (API Reference).
Case Studies of Common Accuracy Errors
① The face is at the edge of the frame
When the face sits at the edge of the frame, its shape becomes distorted. In this API, if the face is cut off at the edge of the frame, the spoof/genuine decision is not run and a 400 invalid_image error is returned (for example, the message Face position error(1011) - move to the center) (an edge-cutoff guard is enabled). To obtain a verdict, capture the face near the center of the frame.
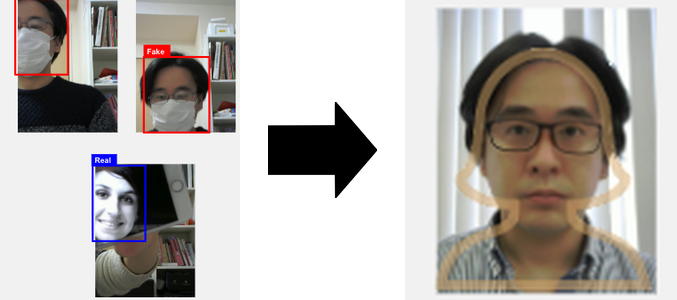
✅ Countermeasure: Display a guide frame that steers the face to the center in your capture application, and send the detection request only after confirming that the face is centered.
This edge-cutoff guard is enabled on the server side and cannot be disabled with a request parameter. When a
400 invalid_imagecontainingmove to the centeris returned, recapture the image with the face moved toward the center.
② The whole image or the area around the face is dark
Dark images may produce both false positives and false negatives.
Note that even when you capture in a bright location, depending on the camera’s performance the face may appear dark (rendered in shadow). Check the brightness of the actual captured image, not just whether the surroundings are dark (you can check the brightness of the face region with faceBrightness in the response).
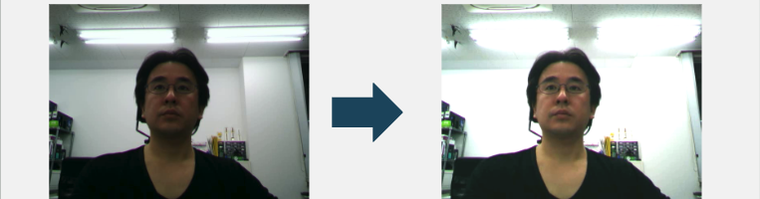
✅ Countermeasure: Apply contrast correction on your side before sending. Alternatively, you may select a camera with light-compensation features.
With OpenCV, use cv::convertScaleAbs() (for example, alpha=1.5 / beta=20).
import cv2

img = cv2.imread("face.jpg")
corrected = cv2.convertScaleAbs(img, alpha=1.5, beta=20)
cv2.imwrite("face_corrected.jpg", corrected)
Aim for an average luminance of 50.0 or higher in the face region (you can check this with faceBrightness in the response).
③ Something bezel-like appears in the background
When a straight, frame-like shape such as a window frame, a sash, or the edge of a display appears in the background, false positives (rejecting genuine users) increase.
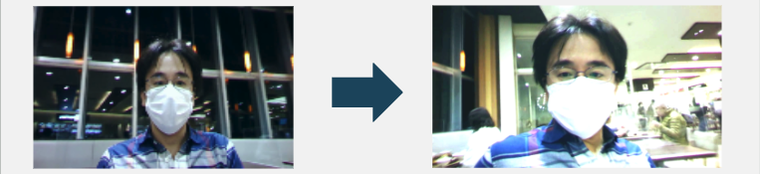
✅ Countermeasure: Change the location (background) where you capture the image. A plain wall or any background without frame-like shapes is recommended.
④ The face fills the frame
When the face is captured so close that the bezel of a smartphone or tablet is hidden, the cues for spoof detection are lost. In this API, when the face’s share of the whole image exceeds the upper limit (about 65%), the spoof/genuine decision is not run and a 400 invalid_image error is returned (for example, the message Face position error(1005) - Too close). Getting closer to the camera therefore does not let you slip past detection.
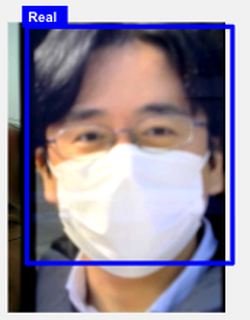
✅ Countermeasure: As described under “Capture Distance”, keep a distance of 30 cm to 1 m between the camera and the face so that the face does not fill most of the frame.
This face-area upper limit is enabled on the server side and cannot be changed with a request parameter. When a
400 invalid_imagecontainingToo closeis returned, recapture the image slightly farther from the camera.
Checklist
Before sending a detection request, verify that the input image meets the following.
If errors persist, please also refer to the FAQ / Troubleshooting.